Affiliates

Monday 26 February 2018

The dreaded MoT 2018

It has sadly worked out the my MoTs are due not long after Christmas... which means after being out of pocket to provide some decent presents for the kids, I've also got to prepare for some hefty repairs for the MINI. 

As I'd managed to keep on top of most things I was hopeful the MINI would scrape through the test and I would be allowed to keep it on the road for another 12 months without too much expense. If you know anything about my blogs, you'll know it's never quite that simple for me.

Firstly I hadn't realised when my current MoT ran out. After thinking about it one day and realising my tyres were getting a little worn, I thought "ooh better get it in quick before they go." 

So one night I checked online to see when the MoT ran out and it told me I had two weeks left. "Eeeek!" I thought. This is gonna be a close one if I have any repairs.

The first thing the next morning I called up my local garage I use and as usual got booked straight in for later that day.

I had a new guy doing the test who I hadn't met before, but he seemed friendly enough. UNTIL I started taking pictures and filming. Well, I am a journalist... how else do you expect me to share my exploits?

I was stood in the viewing area minding my own business and when it came to the exhaust emissions test I thought, "ooh this might sound good," so switched to video. The tester sticks his head out of the window and starts shouting at me not to film him - which I wasn't - he wasn't even visible. So I stopped and he got out and approached me and said, "you're not doing yourself any favours. Go and wait in the waiting room," which was the other side of the premises. 

He walked off and I remained in the viewing area, internally refusing to comply with his order. I am entitled to view the test, and was determined to. I almost told him to shut up and just get on with his job, but didn't. With his words ringing in my ears I knew he was going to fail the car. I was in two minds as to whether to kick up a fuss, but this time stayed quiet.
 

Predictably, I was right and after the test he explained what was wrong. After watching him do the test, I had a fair idea of what he was going to fail it on. 
 
Both front CV gaiters had split - fair enough. Not too difficult to remedy. The front driver's seat had quite a bit of movement in it when being pushed from behind as if it was coming away from the rails it sits in or something. OK, this might be a bit harder to fix, unless it is just replaced as a whole. My front registration plate had some water ingress which had warped the lettering, so he failed me on that... and those rear tyres I was telling you about - which I thought might just pass the tread depth test... well they failed too. 

Treating me like I knew nothing about cars he was explaining what everything meant and in the end I was like "yeah, I know."

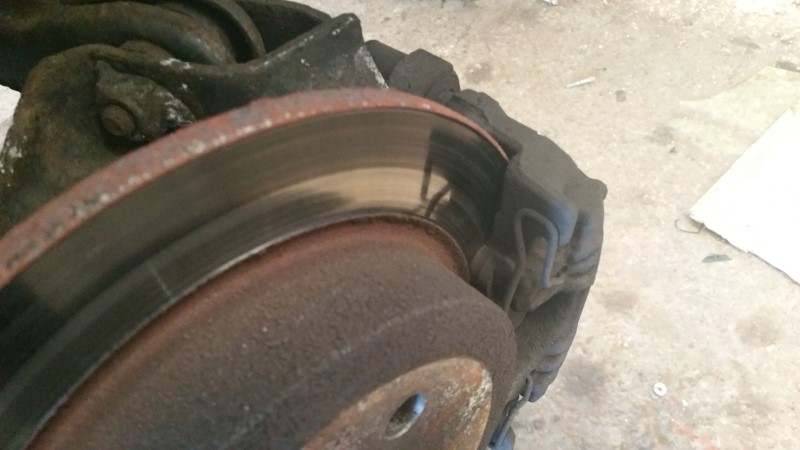
On the advisory front, there was the required Oil Leak that all Minis have, as well worn brake discs and only one slightly worn brake pad on the front passenger side. I'm not quite sure why one set of pads is wearing quicker than the others - possibly a sticky calliper or because the driveshaft is shorter on the passenger side. I'd be interested to hear your thoughts on that one. 

So, that gave me two weeks to get everything fixed. 

Funnily enough I received a phonecall whilst waiting for the start of the MoT from my good pals Mintech. I said I'd give them a call back after the test and let them know if I needed anything. 

I got back on the blower and they said they could fix it all apart from the front registration plate, but that is just a tenner down the local auto parts shop, so no problems with that. 

The problem was that Mintech were choc-a-block booked as the January rush kicked in, and the only day they could fit me in was on the last eligible day of my retest. Well I did say it was going to be tight!!

The day of the retest came and my first stop was to the local auto shop to get the new reg plate. Ten pounds was handed over and the guy behind the counter literally printed off the new number on a household printer and stuck it to the back of some perspex - ten quid for that... a nice little earner!!
 
This is the bit you'll like. I've never bought a new number plate before, so when he handed it to me I was like... "is this right?" The guy nods to me and says "yeah sure," and I say, "well how come my old one is really clear and this looks faded and blurry??" I don't think he understood first time, and I was thinking to myself - this is pretty obvious - so I repeated myself and he finally understood. 

"It's got a protective film on the front to prevent damage in transit." Ohhhh. Didn't I feel stupid... Yes is the answer. Heyho. So with that I set off to Mintech.

Outside their premises it is like a construction site - oh tell a lie - it IS a construction site. Across the road the local council in their 'wisdom' have decided to build new houses on a flood plain - that often floods! Idiots. Anyway it had made the entrance to the yard a mudbath as you can see and parking was at a premium.

The lads were busy with other stuff and the auditors were in, so I couldn't be hanging around the yard like I normally do, so I walked into Bury town for some munch.
 

By the time I got back Nathan and Martin were already working on the car and had already swapped both driveshafts for ones with good gaiters on them and were now changing the rear tyres.

Behind my MINI, the boss had bought an accident damaged Land Rover that they were going to resell on the salvage auction site Copart. 
 
Here are the old driveshafts. 

With the rear wheel off I could have a better look at that welding from last year. With recent problems with the exhaust I had a very good inspection to ensure everything was still secure. There was a bit of sideways movement which I compared to other MINIs in the yard, but was reassured there is meant to be some movement (I just didn't think it should be as much as it was).
 
 Rear pads look OK too. Maybe half worn?


Here you can see the damage to the CV gaiters. It's easier to change the driveshafts than just the gaitors I'm told - anyone with a classic Mini can relate to that. Faffing with grease and zip-ties when the driveshafts just pop in and out - a bit more complex on a MINI though. 

While Nathan cracked on with the tyres, I went and found a drill and decided to make some fixing holes in the new numberplate. Sticking them both in a vice, I simply drilled some new holes where the old ones were.

And then screwed it on. Easy peasy. 

With the tyres done, Nathan needed to get the driver's seat out and see what was wrong, so we pushed it out of the garage for easy access.

 Oh look a protective film covers the registration plate - doh!

Looks nice and clean.

A few bolts undone at the back...

...And a few at the front... 
 

And out it pops....   ewwww.... what a mess (blame the kids!!)


After inspecting the seat it looked like the actual seat was coming away from the frame. Nathan explained it could be a time-consuming job to fix it, so I asked if I could just swap it for one they had - and that was fine. 


We went into the stock room and he passed me down a similar seat, albeit with a few more scuffs than mine had - but I couldn't complain.


The only problem was that the airbag connector had been cut off the replacement seat and so would need swapping from my old one on to the replacement seat. 

With that done, Nathan put the seat back in the car and wired it all up. Reset the fault codes and started her up. Great. Oh hold on... the airbag light has come on. 

We plug in the OBD computer again and reset all the fault codes again and tried again. Same problem. 

I couldn't go off to the MoT with it like that, as it would fail, so Nathan had to take the whole seat out again and look at the airbag connector he had wired up. Ten minutes later and it was sorted and no dash lights. Brilliant.


Just as I was about to set off Nathan remembered he hadn't refilled the gearbox with oil. This is drained before the driveshafts can come out. So we wheeled it back onto the ramp and he showed me how it is filled up. There are two holes for the gearbox oil, one is higher up than the other. Oil is squeezed into the top hole until it can be seen coming out of the lower hole, before the plugs are put back in.  

Once he's done, I'm like a bat out of hell trying to get back home to pick up the kids in time. With about half an hour to spare, I popped into the MoT garage for them to quickly check the fails. The tester asks if I'm here for the retest and I confirm that I am. He says to me, "I think you're out of time for the retest," but I know I'm not. He says, "you only have 10 days," and I'm like, "yeah, 10 working days," i.e. two weeks. So he goes off into the office to put it on the system which will tell him that I'm right. "This won't take long, will it, as I've got to get the kids soon," I ask. "No," says the tester... who seems in a nicer mood today - so decide to let him proceed. 

After checking all the faults, which takes just a few minutes, he takes an age in the office printing off the MoT sheet, but finally he hands it to me with a pass. What a mission. Note to self, don't leave it so close to the deadline next time!!!


Friday 23 February 2018

What a drag

It had only been about six weeks since I had the exhaust welded up after it went all lob-sided and one of the hangars had broken. With that fixed I was a bit miffed when it seemed as though the problem had returned. 

I had noticed the left tailpipe dropping down gradually, but I could put it back in position by hand and it seemed to stay there for a bit. Having not long been to Mintech, and it being the Christmas season, I didn't really want to have to head back there, so I left it.

Well it turns out I didn't fix it soon enough because one day whilst driving along I heard a 'clunk' followed by a scraping of metal sound. I knew exactly what it was, one side of the exhaust had fallen.

I pulled over, not far from home. I grabbed an old headphone cable and tied the dropped tailpipe to the one next to it. That would do to get me home.

Once home I took the MINI to a local car park with a jack and axle stands so I could get a better look at the issue. With it all jacked up I could see that nothing was broken, it was simply one of the exhaust pipes was loose where it joins into another pipe. The exhaust clamps were rotten to hell, but essentially, it was an easy fix and no major damage.

In the meantime I had a look in the boot for something more long-lasting. That headphone wire wouldn't last long at all. I found some rope in the boot that I had used for various things. I tied this around the tailpipes and fed it through the hole in the battery box and tied it to the hooks on the inside of the boot. Now that should hold it for a while.

And it did. But still, I hadn't booked the car into the garage to get it fixed and eventually the heat of the exhaust melted/burnt through the rope and I had to tie it up again with an even shorter bit of rope. Now I really did need to visit a garage. 

I spoke to my local garage and asked if I could use their ramp and I would fix it myself, but they were having none of it. So I bit the bullet and called Mintech again. I said I just need to borrow your ramp for a bit to put some new exhaust clamps on. "C'mon over Craig." They either really love me, or are just resigned to me relying on them to help!

On the way over I pop in to Halfords, armed with my Trade Card, and pick up a couple of exhaust clamps for something ridiculously cheap, like £1.26 each. Super chuffed I headed to Mintech.

We get the car up on the ramp and I wiggle the exhaust pipe and my diagnosis was correct thankfully. 

One look at the old exhaust clamps and Martin reaches for the grinder! My favourite tool!


With the old clamps in the bin I keep the tailpipes steady whilst Martin fits the new clamps, which need a little 'persuasion' to fit together - (yes they were the right size!).

Here's my mend and make-do solution. The holes on the rear of the pipes are where the joining bracket used to hold the two pipes level. This has snapped off now. 


Swan neck pliers do the job and we eventually get the nuts on.

Here's how rusty all the other exhaust clamps are.


 Shiny, new and now tight! Those tailpipes aren't moving now!! Another job sorted.


Wednesday 21 February 2018

Keeping it cool

When I was last at Mintech a few weeks ago getting the alternator replaced, the lads noticed the radiator had a leak coming from it. 

With no time to replace it at the time, I was tasked with keeping it topped up and training a watchful eye on the temperature gauge until I could get booked back in.

Just before Christmas they Mintech lads found a slot for me and I duly hurried over for the next fix my MINI needed.

Surprisingly Martin was smiling today... maybe because I was asking what his favourite beer was...

The boys set to work and within no time at all the front was off and the radiator was coming off too.

What ARE you doing? Hahaha

The replacement radiator slots in nicely and all the pipes are reconnected.

The MINI hadn't had a full oil change for over a year (just topped up to replace the leaked oil) and my inspection reminder kept popping up on my dash so I brought a big bottle of Liqui Moly's oil (our sponsor) over so they could do that too. 


"Have you got a new filter?" Martin asks...   Err, No. So he kindly grabs me one from the shelf!

Back to the radiator and Martin still hadn't finished. He unscrewed a screw on a pipe at the front and after pouring a load of water in, he then started to, what seemed like, kiss my coolant reservoir. In actual fact he was carefully blowing, pushing the water around the system to prevent an airlock. 

As soon as we saw water come up from the screw he had undone, he did it up again and topped up the reservoir until it just came up to the top of the fins. 


Once that was all done, the MINI was ramped up and the main sump plug was undone to drain out all the black stuff.


Once it had all drained out, the filter was changed before the new Liqui Moly oil was used to fill it up. I'm sure he said it takes about 4 litres (but may be mistaken).


A couple of blog posts ago, I talked about how my horn had stopped working after rain had got into my steering wheel when the window regulator was stuck down. 

Anyway, it has been a good six months since the horn stopped working and with the MoT due in the next couple of months I did need to address it. 

In a rare occurance, it didn't seem as busy in the Mintech garage as it usually is, and I asked Martin about the horn issue hoping for some wisdom on what might be the cause. I tell him about me trying new fuses that just keep blowing.

He turns round to me like I'm an idiot and asks if I've tried putting another horn on it. Funnily enough the answer was no, because I don't have a load of spares hanging around. 

Right next to him was a wrecked bumper which had been chucked in the skip. He grabbed it, and ripped off a horn with his bare hands and moved over to my MINI. Now I didn't realise there were/are two horns on the MINI. He has a fiddle around and in a couple of minutes he's hooked up the other horn to my MINI. "Go give that a try," he says.

"Beeeeeeeeeeeep!!!"  Well what do you know. I hate it when that happens. I've been driving around without a horn - getting frustrated at idiot drivers - and unable to make my frustration audiable, and Martin comes along and fixes it in no time at all. I should be grateful, and really, I am! I'm definitely going to have to get him some beer now!!


www.mintechspares.co.uk/